The Best Guide For Custom Domains in Ruby on Rails


In this guide, we'll provide a clear and concise walkthrough to help you easily implement custom domains for your Ruby on Rails application. This guide comes with an example GitHub repo that you can use to kickstart your development of custom domains.
The process of integrating custom domains into your Ruby on Rails application is surprisingly straightforward and can be completed in a short amount of time — typically between 5 to 20 minutes. It's easier than you might have thought!
Here are the key things we'll cover in this guide:
DNS and Routing Requests
Handling Requests in Ruby on Rails Applications
Enabling HTTPS
Automating HTTPS and Certificates with SaaS Custom Domains (optional)
DNS and Routing Requests
The first thing you may ask yourself is how requests from custom domains even end up hitting your Ruby on Rails application. Understanding DNS, CNAME, and A records is crucial for managing how the Internet routes traffic to websites and services. Let's break them down:
DNS (Domain Name System)
What It Is: Think of DNS as the phonebook of the internet. When you type a website address (like
www.example.com) into your browser, DNS translates that human-readable domain name into an IP address (like192.0.2.1) that computers use to identify each other on the network.How It Works: Your browser asks a DNS server for the IP address associated with the domain name. This process is called a DNS lookup. The DNS server responds with the correct IP address, allowing your browser to establish a connection with the website's server.
A Record (Address Record)
Function: It maps a domain name directly to the IP address of a server. This is one of the most fundamental types of DNS records. For example, an A Record might link
www.example.comto192.0.2.1.Usage: When a DNS lookup is performed for a domain name, the DNS server checks its A Record to find the corresponding IP address.

CNAME Record (Canonical Name Record)
Function: Instead of mapping a domain name to an IP address, it maps a domain name to another domain name. It's like creating an alias. For instance, a CNAME record might link
blog.example.comtowww.example.com.Usage: This is useful for managing subdomains or for services hosted outside your primary domain (like a blog or a store). When a DNS lookup is performed for
blog.example.com, the DNS server first resolveswww.example.comand then follows its A Record to reach the final IP address.

Key Differences Between A Record and CNAME Record
A Records link a domain directly to an IP address. CNAME Records link a domain (or a subdomain) to another domain (or subdomain), which then resolves to an IP address.
Additionally, most DNS management systems do not allow users to add CNAME records on the root domain, only A records are allowed on the root or apex domains.
What this means in practice is that if you want to let your users use a custom subdomain, they will have to use a CNAME. If you want to let them use a custom root domain, they will have to use an A record. Let's see an example.
Practical Example
Imagine your Ruby on Rails application is a status-monitoring application running on the domain app.statuspage.com and you host it on a server with IP 192.0.2.1.
If you want to let your users use a custom subdomain for their status pages, e.g. status.intercom.com they would have to create a CNAME record at status.intercom.com and point it to your app at app.statuspage.com.
Then, when someone visits status.intercom.com the request is routed to app.statuspage.com for your Ruby on Rails application to handle it and return the correct information to the visitor.

Now imagine you want to let users have their status pages on the root domain, e.g. intercomstatus.com. As we talked about it, you cannot create a CNAME on the root domain so your users would have to create an A Record.
They'd set up an A Record to link intercomstatus.com to your server's IP address 192.0.2.1. Then, when a visitor opens intercomstatus.com the request is routed to your server's IP address.

IMPORTANT: If using the A record, ensure your server IP is static and doesn't change, ever! In case it changes you’ll have a bad time. All the existing A records your customers created will then point to the old IP that doesn’t belong to your application server anymore. You'll have to reach out to all of them asking to change their A records. Get ready for a sleepless night.
DNS Summary
We've covered three concepts in this chapter — DNS, CNAME and A records. Here's a quick overview of all three:
DNS: Translates domain names into IP addresses — think phonebook of the Internet.
A Record: Directly maps a domain name to an IP address — think root domains.
CNAME Record: Maps a domain name to another domain name (alias) — think subdomains.
After creating correct DNS records, visitors to custom domains will be routed to your Ruby on Rails application. In the next chapter, we'll cover how to handle those incoming requests in your Ruby on Rails application.
Handling Requests From Custom Domains in Ruby on Rails Applications
The next step is to manage how your application responds to requests from different custom domains. This is useful if you want to display different information on the page based on the custom domain. You can show different text, different images, and much more.
Identifying the Request Source: Every request made to your application from a custom domain will include the Host header. This header tells you which domain the request came from.
For example, if a request comes from status.intercom.com, the Host header will be set to status.intercom.com.
Handling Requests in Rails: In your Rails controller, you can use this header to determine how to respond to the request and what information to show. Here’s a Ruby code snippet to guide you:
class StatusPageController < ApplicationController
  before_action :set_company
  before_action :set_company_status_data

  def index
    # In index.html.erb use @company and @company_status_data
    # to show correct information for the company
  end

  def set_company
    @company = Company.find_by(domain: request.headers['Host'])
  end

  def set_company_status_data
    @company_status_data = @company.fetch_status_data
  end
end
In this example, we assumed there was a Company model with the domain field. Use this code example as a guide but feel free to tweak it as necessary.
Here's a flowchart to better visualise how the request is travelling through different parts of the system.
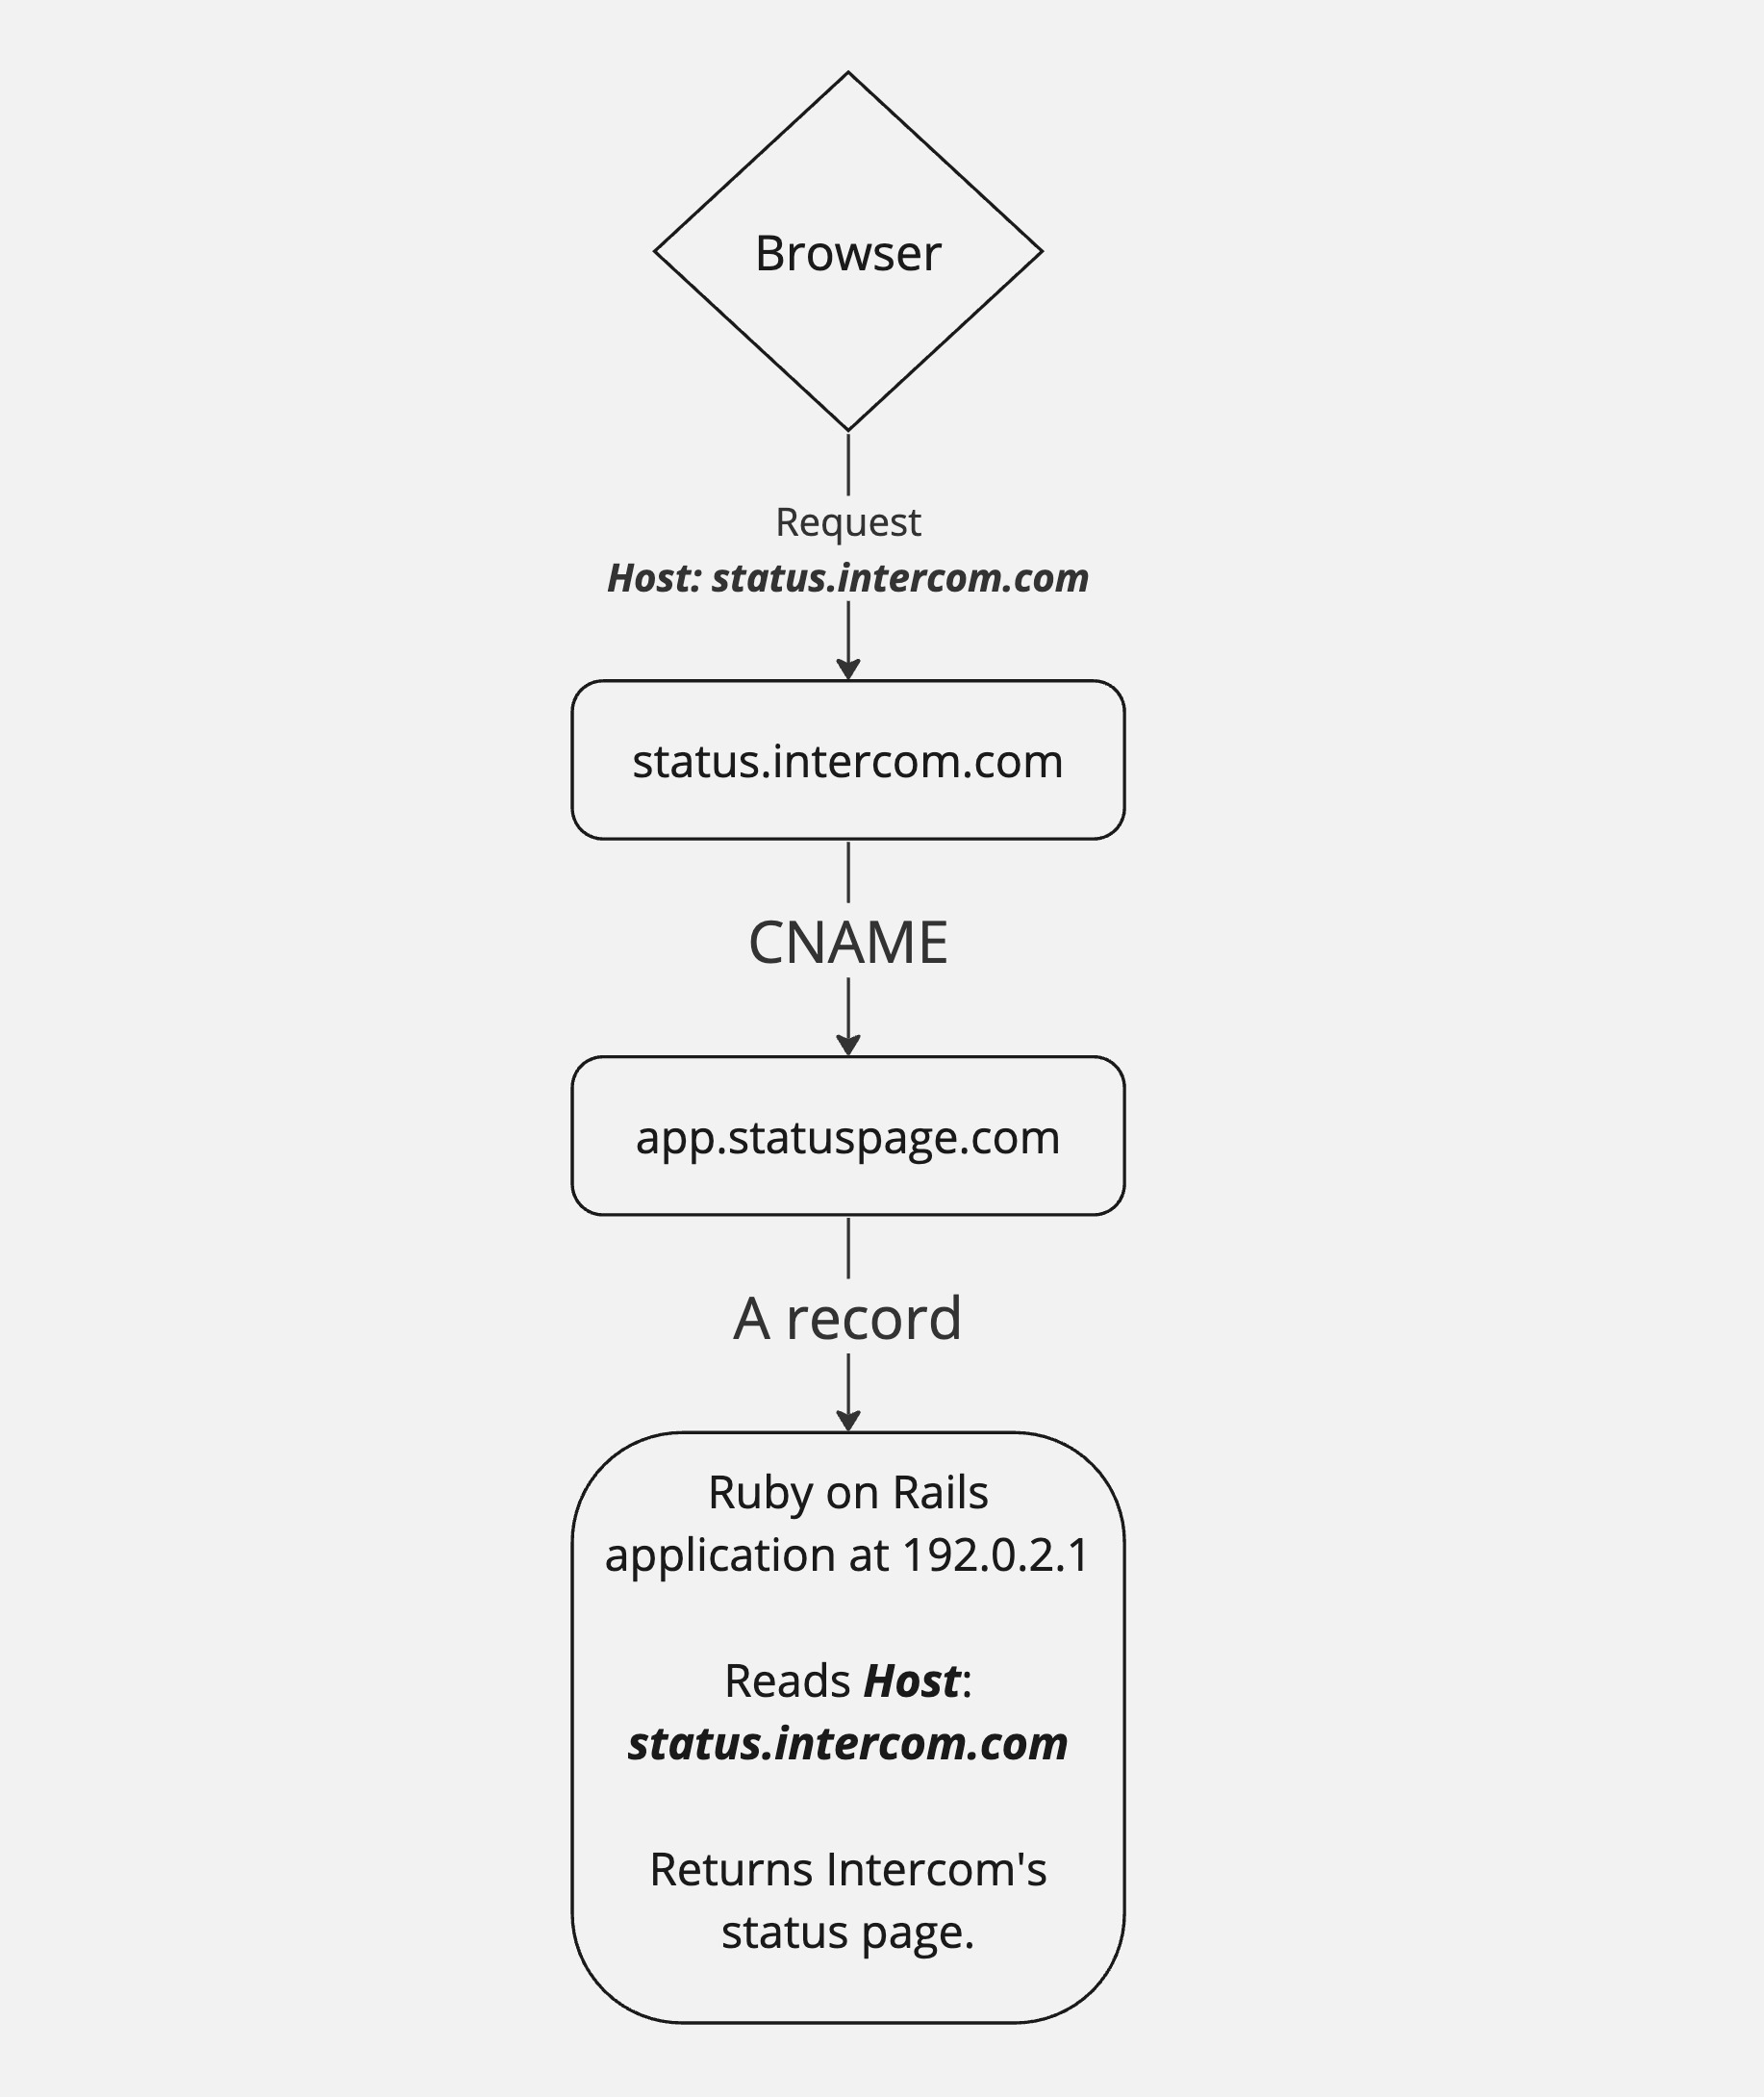
Finalizing Your Setup: With this code in place, your application can now differentiate and respond to requests based on their originating domain.
Enabling HTTPS
If your customers just point their domains to your app and try to visit the domain, they’re in for a nasty surprise.
Your app doesn’t support HTTPS for these custom domains yet. Without HTTPS the browser will show a terrifying warning and prevent the user from accessing your application.
Where are the good ol' Internet days when everything ran unencrypted on HTTP and people simply trusted each other? Oh well, let's get on with it.
What is HTTPS?
HTTP is a protocol used for information exchange on the web. HTTPS is the improved version.
In short, HTTPS is a secure version of the HTTP — S stands for secure. As you can see, they were very imaginative when they named it.
If you see HTTPS being used, you can be sure that no one is eavesdropping on your conversations. This is very important on the Internet because a lot of sensitive data is sent between you and the websites you visit.
How HTTPS Works
SSL/TLS: The security of HTTPS is based on SSL/TLS (Secure Sockets Layer/Transport Layer Security) protocols. These protocols manage the encryption and decryption of data sent over the connection.
Certificates: Websites use SSL/TLS certificates to authenticate themselves to users. When you visit an HTTPS site, your browser checks the website's SSL certificate to make sure it's valid and issued by a trusted authority.
This is the hard part, the certificates. For each of the custom domains, you'll have to issue a new certificate. This can be handled by running a TLS-terminating reverse proxy in front of your Ruby on Rails application.
TLS-terminating reverse proxy is a server that receives requests from custom domains, and then handles the HTTPS part. Your visitors will see a nice green padlock in their browsers telling them the connection is secure. In short, this proxy receives the encrypted request, decrypts the request and forwards it to your Ruby on Rails application for you to handle it.
How to properly and securely run TLS-terminating reverse proxy is out of the scope of this guide. But, if you want to build it yourself, we go into more detail in The Ultimate Guide To Custom Domains For Your SaaS App.
But, if you want to quickly enable HTTPS for only $16/month (less than what it would cost you to run a single TLS-terminating proxy), please keep reading.
Automate HTTPS and Certificates with SaaS Custom Domains
Building the system to support HTTPS and certificate management can be a daunting, and expensive, task.
Let's just list a few things SaaS Custom Domains will do for you out of the box:
Certificate management: we automatically renew expiring certificates and issue new ones, storing them securely.
Low Latency, High Availability and Reliability: our server fleets are strategically located across multiple continents and close to your users, ensuring minimal latency and optimal performance. In the event of regional disruptions, we automatically reroute traffic to the nearest healthy region.
API & Webhooks: we have the most easy-to-use API. Add or remove custom domains with ease, get notified in case of DNS issues with webhooks, and much more.
Active Monitoring: experience peace of mind with our full-stack monitoring, from DNS to applications. We automatically fix any issues that arise, ensuring uninterrupted service.
Automated DNS Instruction Emails: we can automatically send your customers a detailed email explaining how and which DNS records to add.
SaaS Custom Domains is the best solution for enabling custom domains for your application. You can have your Ruby on Rails application support custom domains with HTTPS in less than 10 minutes.
We'll handle the heavy lifting of managing multi-region infrastructure, security patching, handling TLS certificates and much more, freeing you to focus on solving your customers' problems.
You're with us? Great! Let's get you up and running with custom domains in less than 20 minutes. The best thing? You can try it for free, no credit card required.
Here are the key steps you'll follow:
Create an API Token (Approx. 1 minute): This first step involves generating an API token, which is crucial for authenticating your interactions with the SaaS Custom Domains API.
Create an Upstream (Approx. 1 minute): Setting up an upstream is essential for directing requests to your application server. This quick step ensures that your app correctly handles incoming traffic.
Create a Custom Domain (Approx. 1 minute): Here, you'll assign a custom domain to your application, a vital step for branding and user accessibility.
Create a CNAME Record for the Custom Domain (Approx. 1 minute): This step involves updating DNS settings to link your custom domain with the application, an important part of making your domain work.
Handle Forwarded Requests in the Rails Application (Optional, 5-15 minutes): If needed, you can customize how your application responds to requests based on the originating domain, adding a level of personalized functionality.
With these steps, you'll be well on your way to successfully integrating custom domains into your application. Let's dive into each step in more detail.
Create an API Token
To begin, acquiring your API token is a crucial first step. This token is key to enabling your application to communicate with the SaaS Custom Domains API.
Accessing the API Token: Navigate to the API section in your account settings within the application.
Generating Your Token: Once you're in the API Tokens section, follow the prompts to generate a new token.

Ready for API Calls: With your API token in hand, you are now equipped to make API calls to the SaaS Custom Domains API. This token will authenticate your requests and facilitate a smooth integration process.
Remember, keeping your API token secure is vital. Treat it like a password, as it grants access to your SaaS Custom Domains data and settings.
Create an Upstream
Setting up an upstream is a vital step in ensuring that the custom domain requests are correctly routed to your Ruby on Rails application. In technical terms, an upstream is the server (in this case, your Ruby on Rails application server) that the reverse proxy will forward requests to.
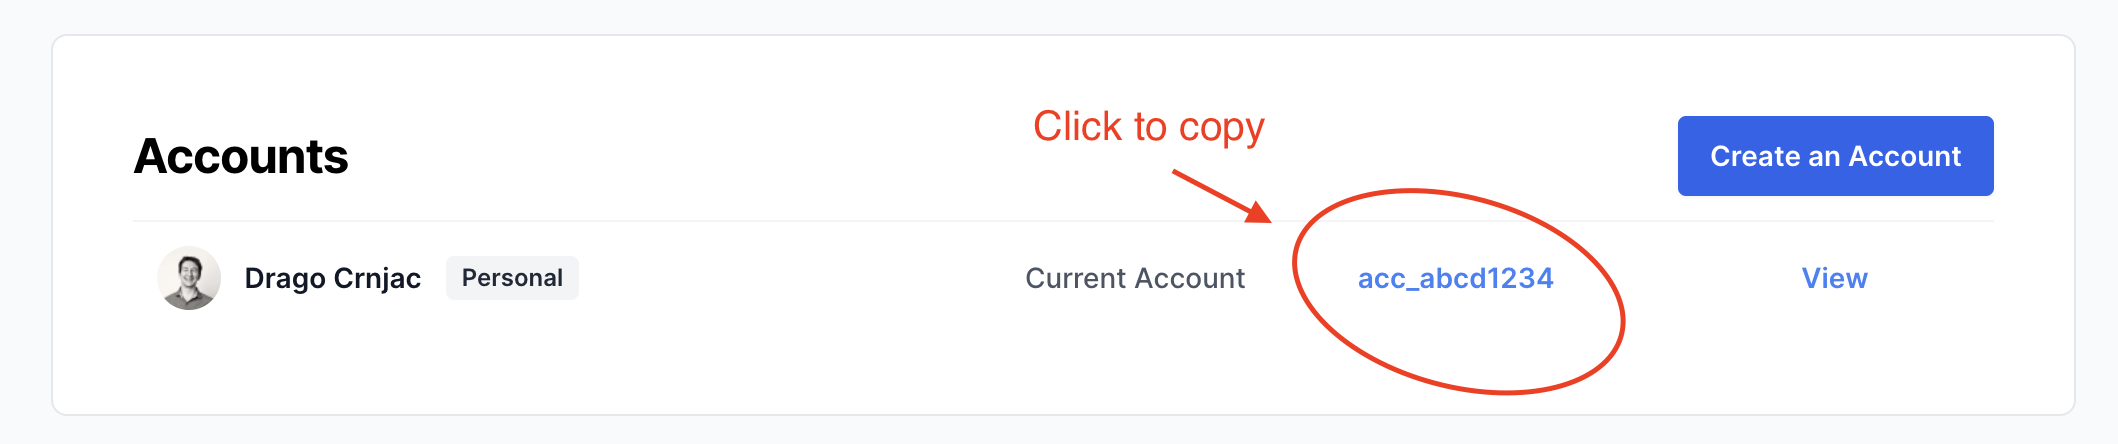
Identify Your Account UUID: Before proceeding, you need to locate your account UUID. This unique identifier is found in your account settings. Here is a screenshot of the Account Settings UI for your reference:
Configuring the Upstream: Let's assume your application is hosted at app.example.com. Open the Rails console to start setting up your upstream with the provided Ruby script:
require 'net/http'
require 'uri'
require 'json'

account_uuid = 'your_account_uuid'
token = 'your_api_token'

base_url = "https://app.saascustomdomains.com/api/v1"
url = URI("#{base_url}/accounts/#{account_uuid}/upstreams")
http = Net::HTTP.new(url.host, url.port)
http.use_ssl = true

data = { host: 'app.statuspage.com' }

request = Net::HTTP::Post.new(url)
request['Authorization'] = "Bearer #{token}"
request['Content-Type'] = 'application/json'
request.body = JSON.dump(data)

response = http.request(request)

JSON.parse(response.read_body)
=>
{"uuid"=>"your_upstream_uuid",
 "host"=>"app.statuspage.com",
 "port"=>443,
 "tls"=>true,
 "bubble_io"=>false,
 "created_at"=>"2023-03-14T15:47:56.844+01:00",
 "updated_at"=>"2023-03-14T15:47:56.844+01:00",
 "account_uuid"=>"your_account_uuid"}
Once you execute the script, you've successfully created your first upstream. This is a significant milestone in customizing your application.
For more in-depth information about upstreams and their capabilities, we recommend exploring our Upstreams API Documentation.
Create a custom domain
Having set up your upstream, the next crucial step is to create a custom domain. This domain will be the address your customers use to access your application, and it's essential for branding and ease of access.
Choosing the Custom Domain: For this guide, let's consider that you want to add status.intercom.com as a custom domain for your application. This domain will be configured to forward requests to the upstream we previously set up.
Implementing the Custom Domain: To set this up, you'll need to use the Ruby script provided below. This script automates the process of linking your chosen custom domain with your Rails application. Once this is done, SaaS Custom Domains will know to forward requests coming for this custom domain all the way to your Ruby on Rails application, or as we call it, the upstream.
require 'uri'
require 'net/http'

account_uuid = 'your_account_uuid'
upstream_uuid = 'your_upstream_uuid'
token = 'your_api_token'

custom_domain_host = 'status.intercom.com'
base_url = "https://app.saascustomdomains.com/api/v1"
url = URI("#{base_url}/accounts/#{account_uuid}/upstreams/#{upstream_uuid}/custom_domains")

http = Net::HTTP.new(url.host, url.port)
http.use_ssl = true

request = Net::HTTP::Post.new(url)
request['Authorization'] = "Bearer #{token}"
request['Content-Type'] = 'application/json'
request.body = {
  host: custom_domain_host
}.to_json

response = http.request(request)

JSON.parse(response.read_body)
=>
{"uuid"=>"your_domain_uuid",
 "host"=>"status.intercom.com",
 "created_at"=>"2023-03-14T16:04:05.489+01:00",
 "updated_at"=>"2023-03-14T16:04:05.489+01:00",
 "last_dns_check_at"=>nil,
 "status"=>"pending_check",
 "instructions_recipient"=>nil,
 "instructions_email_sent_at"=>nil,
 "upstream_uuid"=>"your_upstream_uuid"}
After running the script, you've successfully created your first custom domain, a key milestone in personalizing your application's web presence.
For further details on custom domains and to explore additional functionalities, we encourage you to check out our Custom Domains API Documentation.
Create CNAME for the Custom Domain
With your custom domain ready, the next crucial step is to activate it by setting up a CNAME record. Here’s how to do it simply:
Setting Up the CNAME Record: You need to create a CNAME record for your custom domain, e.g. status.intercom.com, and point this record to in.saascustomdomains.com.
If you’re guiding a customer, ask them to do this on their domain's DNS settings.
Waiting for DNS Propagation: After setting up the CNAME, it might take a short while (usually a few minutes) for the DNS to update globally. Once updated, any visits to status.intercom.com will be correctly directed to your application.
Special Note for Cloudflare Users: If using Cloudflare for DNS, make sure the proxy status is set to DNS only — make the little cloud icon gray. Without this, the custom domain won't work properly

Finalizing the Setup: With the CNAME record in place and DNS changes propagated, congratulations are in order! Requests from your custom domain are now successfully reaching your Ruby on Rails application. Depending on your needs and how your Ruby on Rails application is structured, this might be all that's required. However, if you're looking to implement specific business logic based on the originating custom domain, there's more to explore.
Handle Forwarded Requests in the Rails Application
The final step is to manage how your application responds to requests from different custom domains. We've already covered this step earlier in this guide. But, there's a small difference when using SaaS Custom Domains. Instead of looking at the Host header, we'll be looking at the X-Served-For header.
X-Served-For is a header added by our proxies that tells you from what custom domain the request is coming.
For example, if a request comes from status.intercom.com, the X-Served-For header will be set to status.intercom.com.
Handling Requests in Rails: In your Rails controller, you can use this header to determine how to respond to the request. Here’s a Ruby code snippet to guide you:
class StatusPageController < ApplicationController
  before_action :set_company
  before_action :set_company_status_data

  def index
    # In index.html.erb use @company and @company_status_data
    # to show correct information for the company
  end

  def set_company
    @company = Company.find_by(domain: request.headers['X-Served-For'])
  end

  def set_company_status_data
    @company_status_data = @company.fetch_status_data
  end
end
Finalizing Your Setup: With this code in place, your application can now differentiate and respond to requests based on their originating domain.
Congratulations, you implemented custom domains using the SaaS Custom Domains API in 5 easy steps. If you have any questions please reach out to us via email or via chat widget at saascustomdomains.com.
If you don't have an account yet, you can start your free trial today.